Vacuum hangers are usually the cheaper entry point into hanging, but they do come with more upkeep. The main maintenance issue is sleeve degradation. Sleeves stretch, lose elasticity, tear, and eventually stop sealing well. That is just part of using vacuum-based systems.
They are still the most popular style of hanger for a reason. They are simple, effective, and usually more comfortable than compression-style hangers once you understand how to set them up.
A vacuum hanger works by using negative pressure to hold the glans inside a vacuum bell. The bell has a small valve at the top that allows air to be pulled out. Some companies include a dedicated pull rod to create suction. Others use a normal pump handle or their own in-house solution.
Either way, the concept is the same:
You place the glans into the bell, create vacuum pressure, seal the system with a sleeve, then attach weight or tension. THIS WORKS FOR EXTENDER SET UP AS WELL.
Simple idea.
Slightly annoying execution until you get used to it.
How the Sleeve Works
The sleeve is what keeps vacuum pressure sealed around the shaft.
If you are having seal issues, the sleeve is usually the problem. I would say about 80% of seal problems come from the sleeve, and the other 20% come from something stopping the bell valve from closing properly, like debris, water, dust, or the valve just not sitting correctly.
The sleeve rolls down over the shaft and creates the seal. If the sleeve is old, overstretched, torn, or losing elasticity, the vacuum will leak.
Sleeves will fail eventually.
Most vacuum sleeves are silicone-based, and as they stretch over time, the polymer starts to break down. Once that happens, the sleeve loses elasticity and sealing ability.
Most sleeves last around 4–8 weeks, depending on use and care.
That being said, storing sleeves in baby powder can help keep them fresh much longer. I swear my first vacuum sleeve lasted almost a year because I actually took care of it.
But even with perfect care, sleeves are consumable. They will eventually die. Do not build your whole personality around saving a $12 sleeve.
Vacuum Hanger Sizing
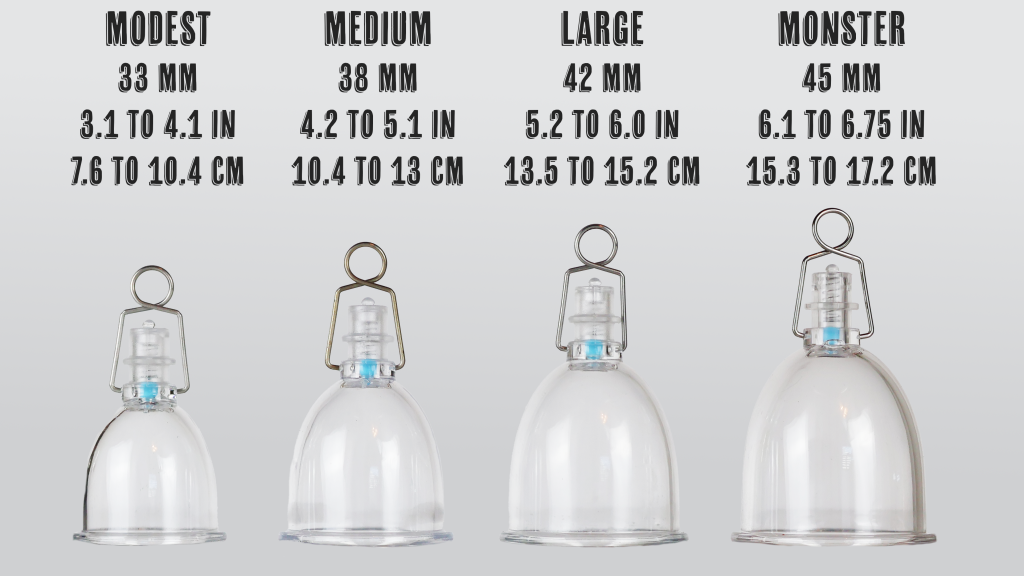
Sizing depends on the style of vacuum bell.
Some companies use very long bells, which can complicate sizing. Others use shorter, generic-style cups. For most guys, the goal is simple:
You want a little room inside the bell so pressure does not build directly at the tip of the glans.
The smaller the surface area, the more pressure gets concentrated into that area. That is one of the main reasons guys get blisters.
It is also one of the main reasons I got so many blisters last year.
I was using a bell that was way too small for my size.
Yes, I am bragging.
But I am also being serious. If the bell is too tight, you are concentrating pressure where you do not want it. That makes blister risk much higher.
Generic Cups
PMP sells generic-style cups because they are my favorite.
Yes, I am biased. It is my company.
But I have still yet to find a version I like better in terms of comfort.
You can find generic cups all over the place. Some people prefer longer cups, like Total Man’s implementation, and more power to them. This comes down to preference, anatomy, and the type of hanging or extending you are doing.
For sizing, always check your seller’s guidelines. Different companies may measure differently, especially if they use longer or uniquely shaped bells.
For PMP and most generic cups, sizing is based on erect glans size around the corona.
That means measuring around the widest, shapely part at the bottom of the glans.
The only size that may not be available everywhere is a 45 mm bell, which mostly matters for guys who are very thick to start. PMP currently has that size available, but for 99% of guys, common generic cup sizes are easy to find.
Protecting Your Skin
If you vacuum hang raw, you are probably going to cause discomfort.
And possibly blisters.
Blisters are usually nuisance injuries. They are annoying, mildly uncomfortable, and they interrupt training, but they are usually not some catastrophic event.
The bigger problem is when guys keep training through them.
If you constantly get blisters and refuse to take time off, you can eventually develop a callus on your glans.
Yes, a callus on your dick head.
No, that is not a badge of honor.
Take time off if you develop a blister.
Why Blisters Happen
Blister risk usually comes from three things:
1. Abrasion
The skin shifts, bunches, and pulls away slightly from the underlying layers. This is why reducing friction matters.
If the glans is rubbing against the plastic of the bell, you are increasing blister risk.
2. Force
The more weight or tension you use, the stronger the vacuum needs to be.
Higher vacuum means more pressure on the glans.
This is why conditioning matters. You need to build tolerance over time instead of jumping straight into higher weights because you got excited and forgot you are attached to a body part with nerve endings.
3. Time Under Pressure
The longer you stay under vacuum in one continuous set, the more fluid can get pulled into the tissue.
More breaks usually means lower blister risk.
This is one of the reasons I prefer structured protocols instead of just hanging forever and hoping the glans survives the experience.
Skin Protection Methods
There are three main ways to protect the glans inside a vacuum bell:
Tape
Water
Lotion
All three can work.
I personally prefer lotion, but let’s go through each.
Taping
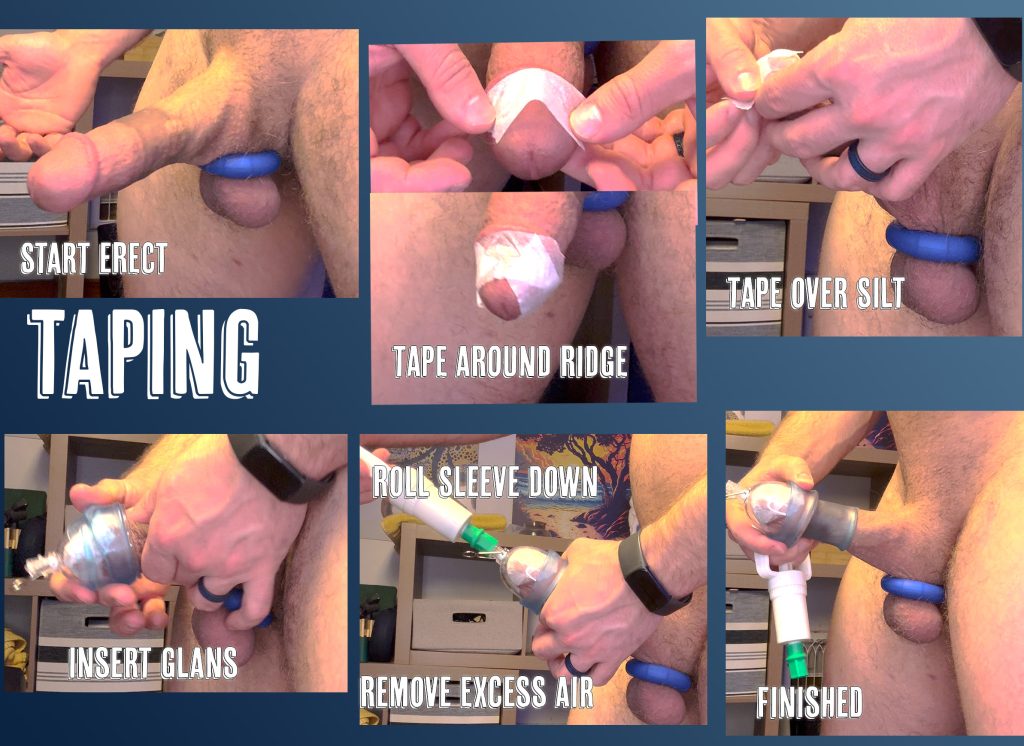
Taping is exactly what it sounds like.
You wrap tape around the erect glans to prevent direct skin contact with the plastic cup.
You tape erect because the glans will swell toward an erect size under vacuum. If you tape while soft, the tape may not sit correctly once expansion happens.
The downside is obvious:
Tape is annoying to remove.
Warm water helps. Soak the tape for at least 30 seconds to loosen the adhesive before removing it.
Taping is not foolproof, though. The biggest issue is air pockets from uneven application. If the tape is not smoothed down against the skin, those pockets can create uneven pressure and still lead to problems.
So if you tape, actually take the extra 20 seconds to smooth it out.
Do not just mummify yourself and hope.
The Water Method
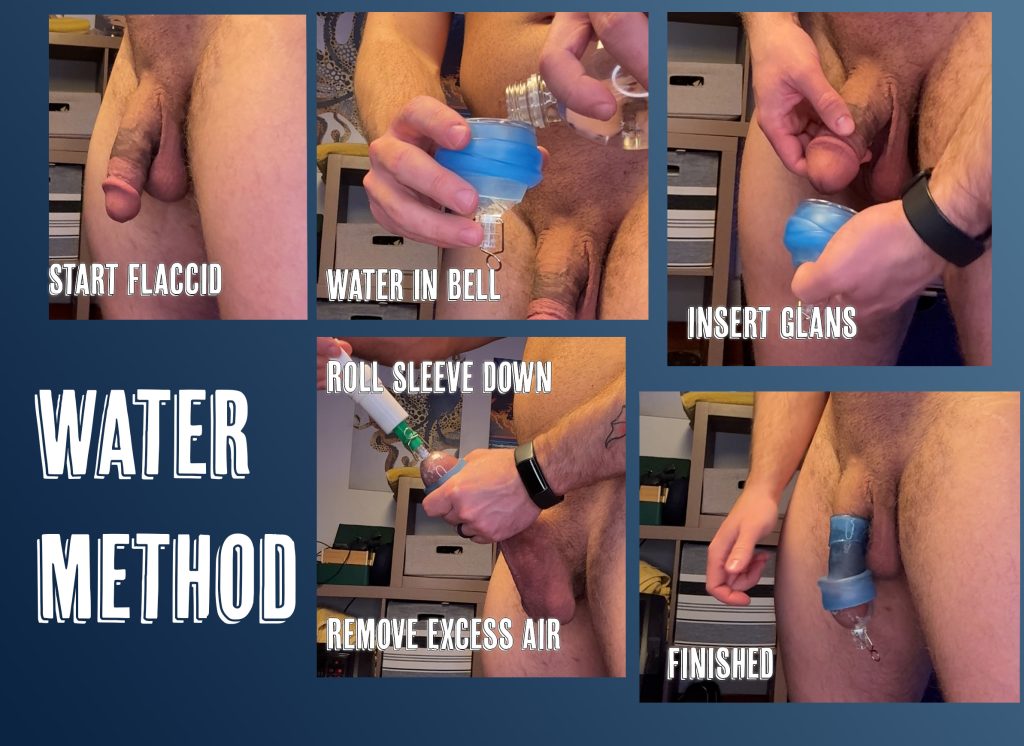
The water method uses a tiny amount of water inside the vacuum bell to create a fluid barrier between the glans and the cup.
And when I say tiny, I mean tiny.
Use about 1–2 mL max.
Put the water into the bell, place the glans inside, flip the sleeve down over the shaft, then pump out the remaining air.
The water helps suspend the glans inside the cup and reduces direct friction against the plastic.
This method tends to work better with larger cups because there is more room for the water barrier to actually do its job.
The downside is that water can make sealing harder. Try to keep the shaft dry if possible, because once water gets under the sleeve, the sleeve may have a harder time holding vacuum.
It can also be messy.
But it is water.
You will live.
Lotion Method
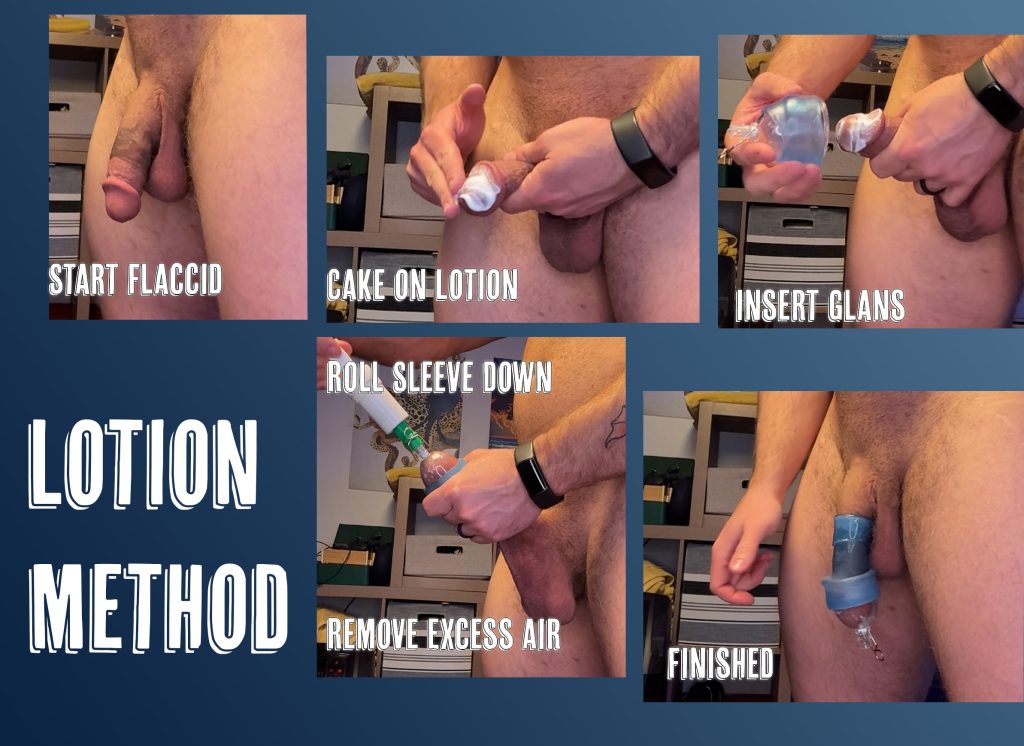
This is my preferred method.
Use a lot of lotion on the glans.
Do not rub it in.
You want the lotion sitting on the surface as a thick barrier. The goal is not moisturized skin. The goal is a protective layer between the glans and the inside of the bell.
Apply the sleeve to the bell first, coat the glans with lotion, then place the glans into the bell and create suction.
The lotion reduces friction, helps protect the skin, and is usually easier to manage than tape.
This is the method I personally use most often.
Final Notes
Vacuum hangers are simple once you understand the system.
The bell holds the glans.
The sleeve maintains the seal.
The protection method keeps your skin from getting abused.
The routine determines whether you are training intelligently or just speedrunning a blister.
Most problems come from poor sizing, bad sleeves, too much force too soon, or staying under vacuum too long without breaks.
Start conservative. Protect the skin. Replace sleeves when they stop sealing. Give blisters time off if they happen.
Routines will be covered in the following posts. For now, use the interval length protocol as your general guide.